2023/06/11(日)Synology DS218+ Entware導入 & Subversion導入
Synology DS218+ Entware導入 & Subversion導入
以前、Entware-ngというパッケージ管理ツールを導入しましたが、Entware-ngとEntware-3xが統合されてEntwareになったようなので、Entwareを導入してみます。それから、DSM7からパッケージセンターのSVN Serverが使えなくなったので、Subversionの導入もやってみます。
Entware-ngアンインストール
/optのマウント解除と、/volume1/@Entware-egの削除をしておきます。(削除しなくても容量食うだけなので、念のため残しておいても良いかも。)
umount /opt
rm -rf /volume1/@Entware-eg
(/etc/rc.localや/root/.profileは、DSMバージョンアップの影響か勝手に戻されてました。)
Entwareインストール
Install on Synology NAS / Entware/Entware Wikiに書かれている通りです。SSHを有効にした後、SSHクライアントで接続して作業します。
- 適当なSSHクライアントで接続します。
- 作業前にroot権限を取っておきます。
- HDDボリューム上にフォルダを作成。
mkdir -p /volume1/@Entware/opt
- /optが既にある場合は削除した上で、/optに/volume1/@Entware/optをマウントします。
rm -rf /opt
mkdir /opt
mount -o bind "/volume1/@Entware/opt" /opt
- インストールスクリプトを実行。プロセッサに合わせて選択する必要があります。
- プロセッサ種別確認コマンド
uname -m
- armv7の場合 (DS216jなど)
wget -O - https://bin.entware.net/armv7sf-k3.2/installer/generic.sh | /bin/sh
- x64の場合 (DS218+など)
wget -O - https://bin.entware.net/x64-k3.2/installer/generic.sh | /bin/sh
- プロセッサ種別確認コマンド
- 開始スクリプトの作成
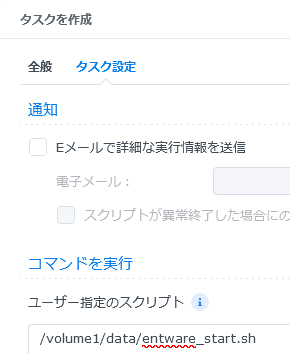
- どこでも良いので(例えば/volume1/data/entware_start.shなど)以下の内容のファイルを作成します。「chmod 700 entware_start.sh」として実行できるようにもしておきます。
- 追記:ファイルを作成しなくても、次のステップの「ユーザー指定のスクリプト」欄に直接入力しても良いです。
#!/bin/sh

# Mount/Start Entware
mkdir -p /opt
mount -o bind "/volume1/@Entware/opt" /opt
/opt/etc/init.d/rc.unslung start

# Add Entware Profile in Global Profile
if grep  -qF  '/opt/etc/profile' /etc/profile; then
	echo "Confirmed: Entware Profile in Global Profile"
else
	echo "Adding: Entware Profile in Global Profile"
cat >> /etc/profile <<"EOF"

# Load Entware Profile
[ -r "/opt/etc/profile" ] && . /opt/etc/profile
EOF
fi

# Update Entware List
/opt/bin/opkg update
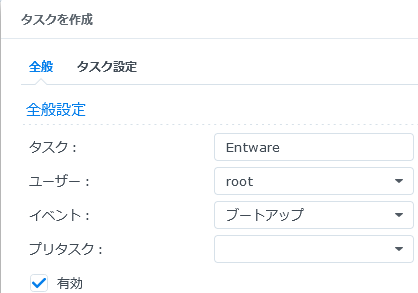
- 自動開始タスクを設定
- NASを再起動
動作確認 & Subversionインストール
- 作業前にroot権限を取っておきます。
sudo -i
- コマンドの存在を確認
opkg -v
opkg version d038e5b6d155784575f62a66a8bb7e874173e92e (2022-02-24)
- パッケージリストの更新&パッケージリストの確認
opkg update
opkg list
- インストール(subversion-server)
opkg install subversion-server
- svnserveがインストールされたことを確認
svnserve --version
svnserve, version 1.14.1 (r1886195)
   compiled Jun  2 2023, 13:56:39 on x86_64-openwrt-linux-gnu

Copyright (C) 2021 The Apache Software Foundation.
This software consists of contributions made by many people;
see the NOTICE file for more information.
Subversion is open source software, see http://subversion.apache.org/

The following repository back-end (FS) modules are available:

* fs_fs : Module for working with a plain file (FSFS) repository.
* fs_x : Module for working with an experimental (FSX) repository.
Subversion実行
/volume1/svnがリポジトリルートの場合、以下のコマンドで実行できます。
/opt/bin/svnserve -d -r /volume1/svn
DSM6のSVN Serverで使っていたリポジトリがそのまま使えました。(アンインストール時にリポジトリを削除するか聞かれるので、間違えて削除しないように注意。)なお、フォルダ暗号化している場合は、マウント操作をした後でないと実行に失敗します。
実行を自動化したい場合は、Entware開始スクリプトの末尾に以下を書き足します。暗号化されていることを考慮して、/volume1/svnが出現するまで待ち続けるようにしています。
(while test ! -d "/volume1/svn"; do sleep 5; done; /opt/bin/svnserve -d -r /volume1/svn)&

